Welcome to part 3 of installing, configuring, deploying, and capturing images with MDT. In Part 2 we deployed a base Windows image, configured it, and captured it for redeploying to new PCs. In this part, we will import our newly captured reference image, set up driver folders for our hardware, and create a new task sequence to deploy our reference image to a new PC.
Importing our new reference image
Continuing on from Part 2, after you’ve successfully captured your reference image, it should now be located in the Captures folder inside your deployment share.

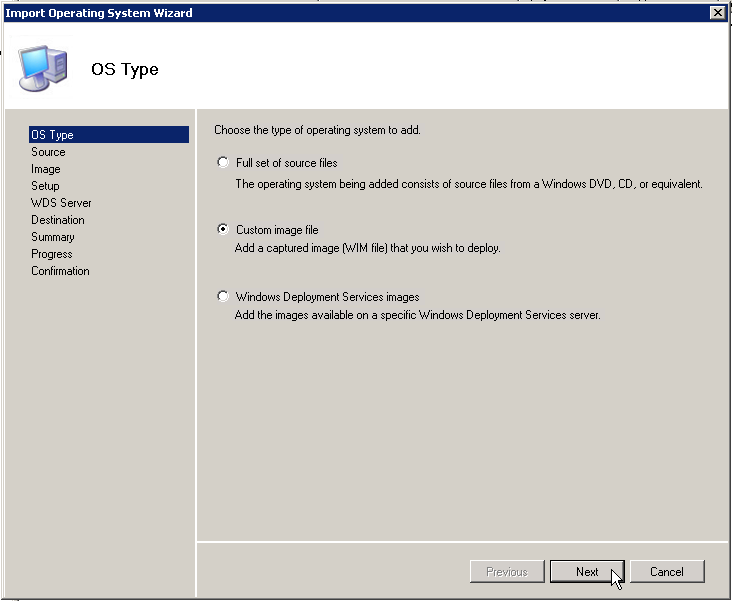
We need to import this into MDT. Open the Deployment Workbench, right-click on Operating Systems, and select Import Operating System.

We’re going to select “Custom image file” this time. Click Next.
Click Browse and navigate to your captured .wim file. For these images, I always select “Move the files to the deployment share instead of copying them.” to save disk space as they are typically around 4GB or larger.

Setup files are not needed.

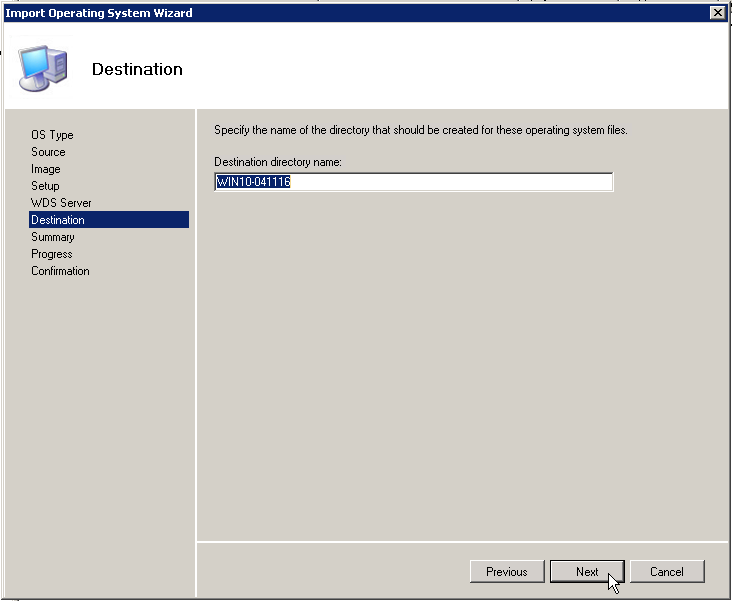
To keep things straight, I always leave the directory name the same as the .wim file image name.
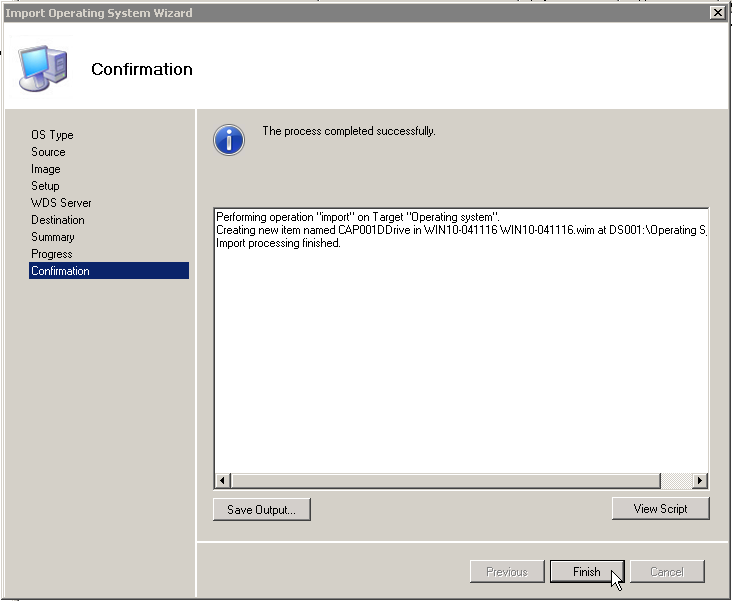
Review the Summary and click Next.

Setting up driver folders for our hardware
Now, before we create a new task sequence, we will want to set up driver folders for the hardware you will be deploying to. We first need to know what machine model WMI sees. To get this information, you’ll need a working model of one of these machines that has an OS on it. Open a command prompt and type in wmic computersystem get model. The model name that is returned is what your folder will be called. Under the Out-of-Box Drivers folder in MDT, create a new folder containing your operating system name. Below that, another folder with the architecture you’re deploying to, and then finally a folder under that containing the machine model name. It should look like this: Out-of-Box Drivers > Windows 10 > x64 > Latitude 6430U.

Now right-click on your model folder and select Import Drivers.

I’ve already downloaded a Windows 10 driver .CAB file from Dell that I’ve extracted to a folder using 7zip so I Browse to that folder and click Next.

Review the Summary and click Next.

You’ll sometimes see warnings about drivers not supporting a particular platform. You can ignore these.

You’ll now see a bunch of drivers in your machine model folder.

Creating a new task sequence to deploy our reference image
We now need to create a new task sequence and then tell our task sequence to inject these model specific drivers. So, right-click on Task Sequences and select “New Task Sequence”.

Because I want to differentiate this from our base Windows install Task Sequence, I’ll give this one the ID of “CU001” and name it “Deploy Windows 10 Custom Image”. And click Next.

Select Standard Client Task Sequence and click Next.

Now you’ll select your custom image you imported earlier and click Next.

On the next screen you can enter a product key, like your VLK MAK key, otherwise, select the default option to “Do not specify a product key at this time.” Click Next.

Enter some default user info. Click Next.

Enter in what you want for a local admin password on your soon-to-be imaged PC. Click Next.

Review the Summary, click Next, and then Finish.


Setting up the Task Sequence
Now that you have a new task sequence created, we need to generate a catalog file for the OS and tell the task sequence to use the machine-specific drivers. Double-click your new task sequence to open it, and click on the Task Sequence Tab.
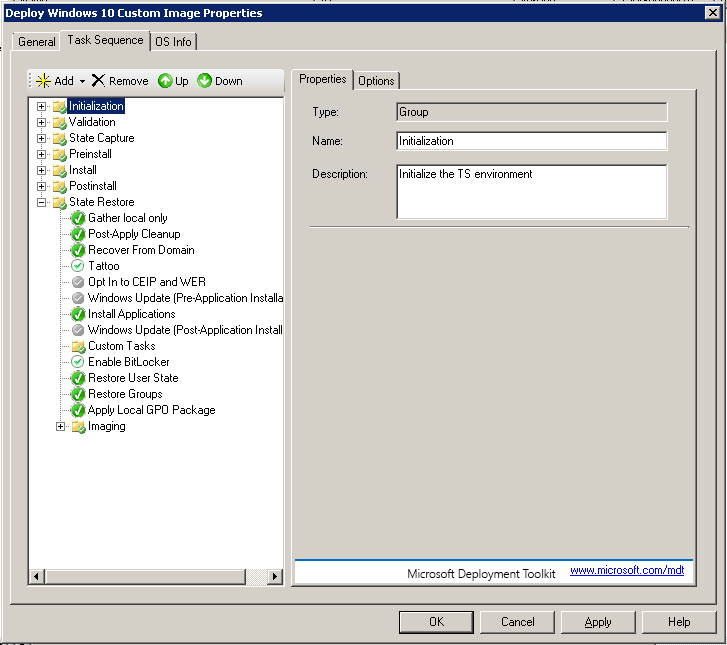
This lists all of the stages and steps the task sequence takes to apply an image to the new PC. There’s plenty you can do in here but we won’t get into that right now. For now, we need to expand the Preinstall section. Click On whatever step is right above Inject Drivers, then click on Add at the top of the columns, hover over General, then select “Set Task Sequence Variable”.
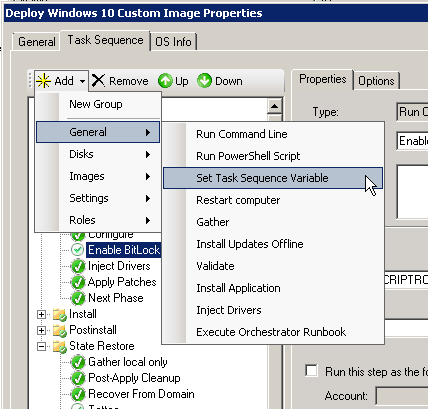
For the name, you can use something like “Set Drivers Path”, “Set Driver Group”, etc. Then in the “Task Sequence Variable” field, type in DriverGroup001 and the value needs to be the folder path to your drivers from the Out-of-Box Drivers section in MDT. In my case it looks like this, Windows 10\x64\%Model%. The %Model% is a variable that MDT populates using WMI depending on the machine model you’re deploying to.

Next click on the Inject Drivers step. In the “Choose a selection profile” dropdown, change it to “Nothing”. Click Apply.

Now we need to generate the catalog file for the operating system. This will generate the Unattend.xml file that the task sequence uses during deployment. Click on the “OS Info” button in the task sequence Properties box. Clicking on the “Edit Unattend.xml” button will start generating the catalog file. This can take a few to several minutes.

Once done, you’ll be greeted by the Windows System Image Manager. This is basically a GUI for generating a proper Unattend.xml file.

The first thing we’ll do is expand the Specialize phase, and click on the Shell Setup grouping (specifically amd64_Microsoft-Windows-Shell-Setup_neutral). In here, put your correct time zone, a product key if needed, and set the CopyProfile option to True. CopyProfile=True will copy all of your customizations from the administrator profile you configured in your reference image before you sysprepped it.

The last thing you’ll want to do in here is validate the answer file. You do this by clicking the orange check mark in the tool bar. When you do this, any errors will show up in the Messages window at the bottom of the window. For whatever reason, there are options set by default by MDT that fail validation. You will see a description of the error and scrolling to the right in the window will give you the path to the setting. You can either revert or delete the settings that are causing validation to fail. Once deleted, check validation again until you see no more errors. Then click the Save button in the toolbar. Then close the window.

You can now close the task sequence Properties window.
We need to add a section into our MDT Rules for our new task sequence. So again, right-click your deployment share in MDT and click Properties. Then click the Rules tab. Since we already have some settings we like listed under ID 001, we’ll copy those and create a new section under that with the ID from our new task sequence. In my case it is CU001.
|
1 2 3 4 5 6 |
[CU001] JoinDomain=DOMAIN MachineObjectOU=OU=Staged Computers,DC=DOMAIN,DC=local DomainAdmin=MDTAdmin DomainAdminPassword=Password DomainAdminDomain=DOMAIN |

Creating a bootable USB for LiteTouchPE
We finally have our custom image imported, our drivers set up, and a new task sequence configured. Now we can deploy our reference image to some actual hardware. You’ll need a LiteTouch PE boot image either on USB or a LiteTouch PE boot image imported into Windows Deployment Services. We’ll discuss the USB drive option here. First, open Windows Explorer, navigate to C:\DeploymentShare\Boot. Right-click the LiteTouchPE_x64.iso file and extract it to a folder with 7zip. Plug in your USB thumb drive. Open a command prompt and type in diskpart. DiskPart is what we’ll use to format the USB drive as sometimes you don’t always get the Fat32 format option in Windows Explorer. We first need to find our USB drive so type in list disk and hit Enter. Find your USB drive in the list and then type in select disk 6 (or whatever number your USB drive is. Mine is number 6). The next command will wipe the drive of all partitions and data so PLEASE make sure you have selected the correct disk first! Once you’re sure you have the correct disk selected, type in the following, hitting Enter after each line:
clean
create part pri
format quick fs=fat32 label=”LiteTouchPE”
This formats the drive as FAT32 and labels it as LiteTouchPE. You should now see it in Windows Explorer. Type exit to close out of diskpart.
Since you have already extracted the contents of your LiteTouchPE_x64.iso to a folder, you can copy all of the contents of that folder to your USB drive. Once it’s done copying, you can eject the USB drive and plug it into your PC to be imaged.
Deploying your custom image
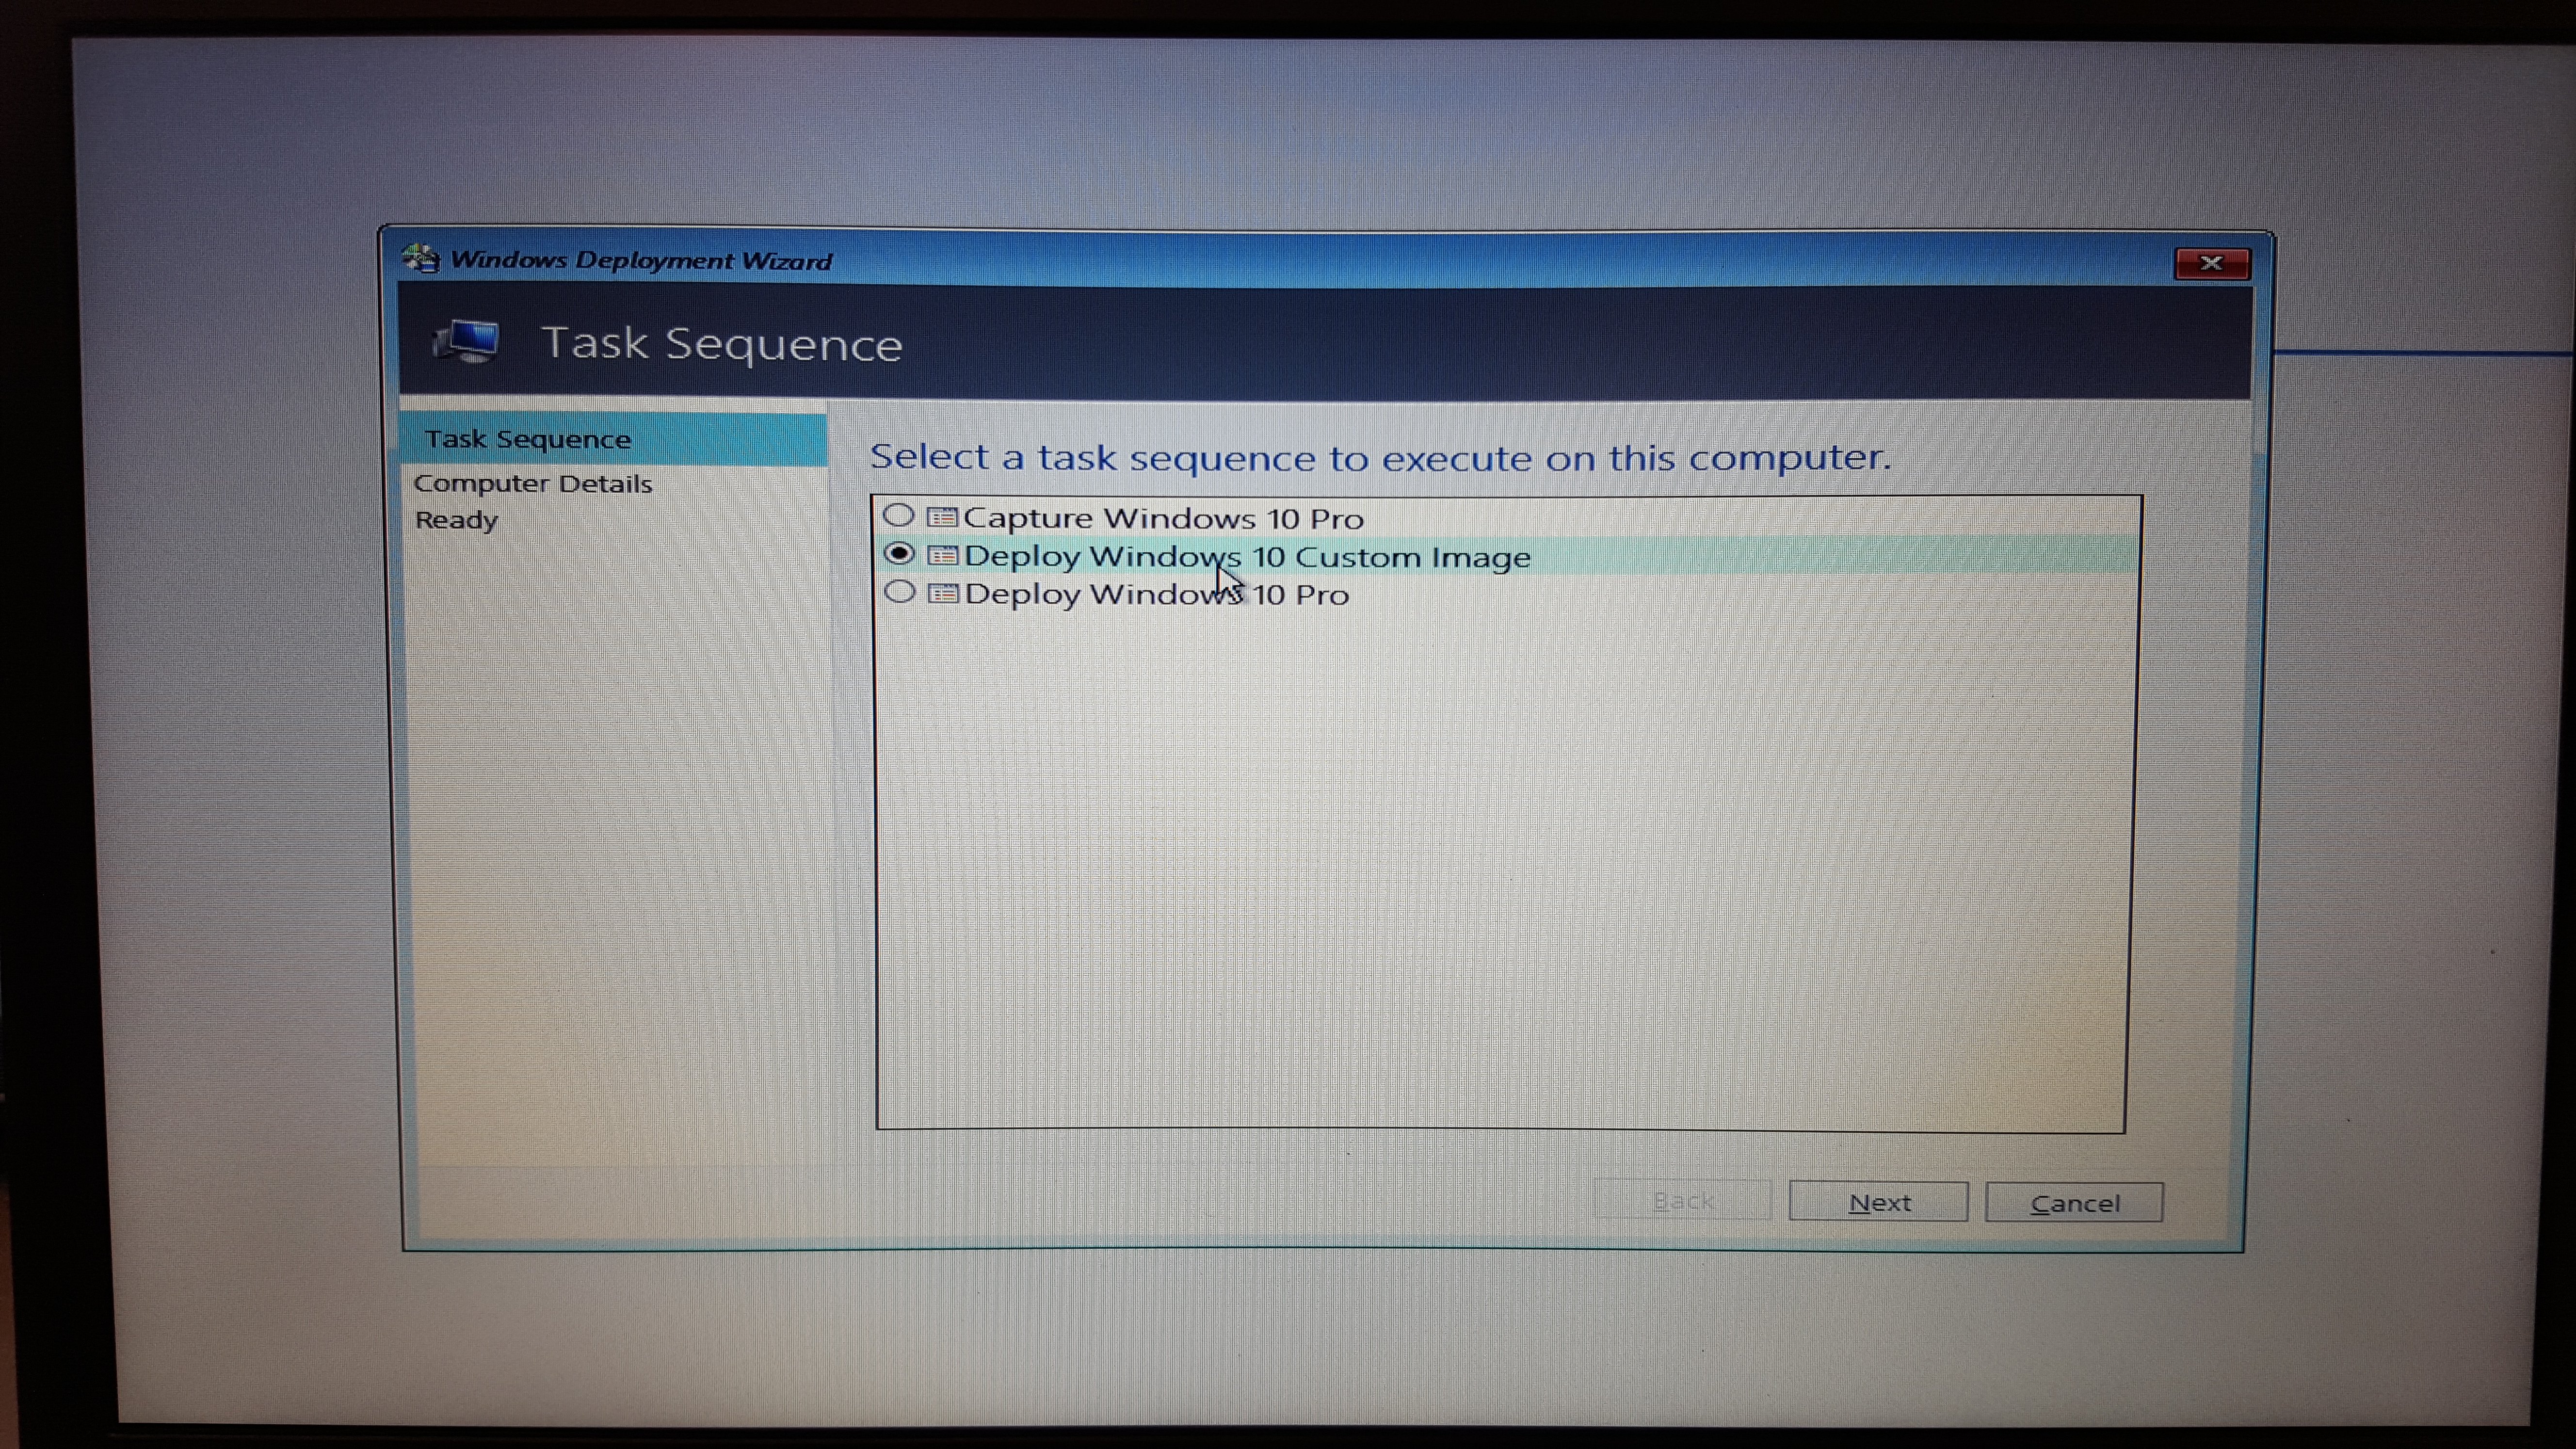
You now need to boot to the USB drive. Once booted, you should see the MDT Deployment Wizard open up.
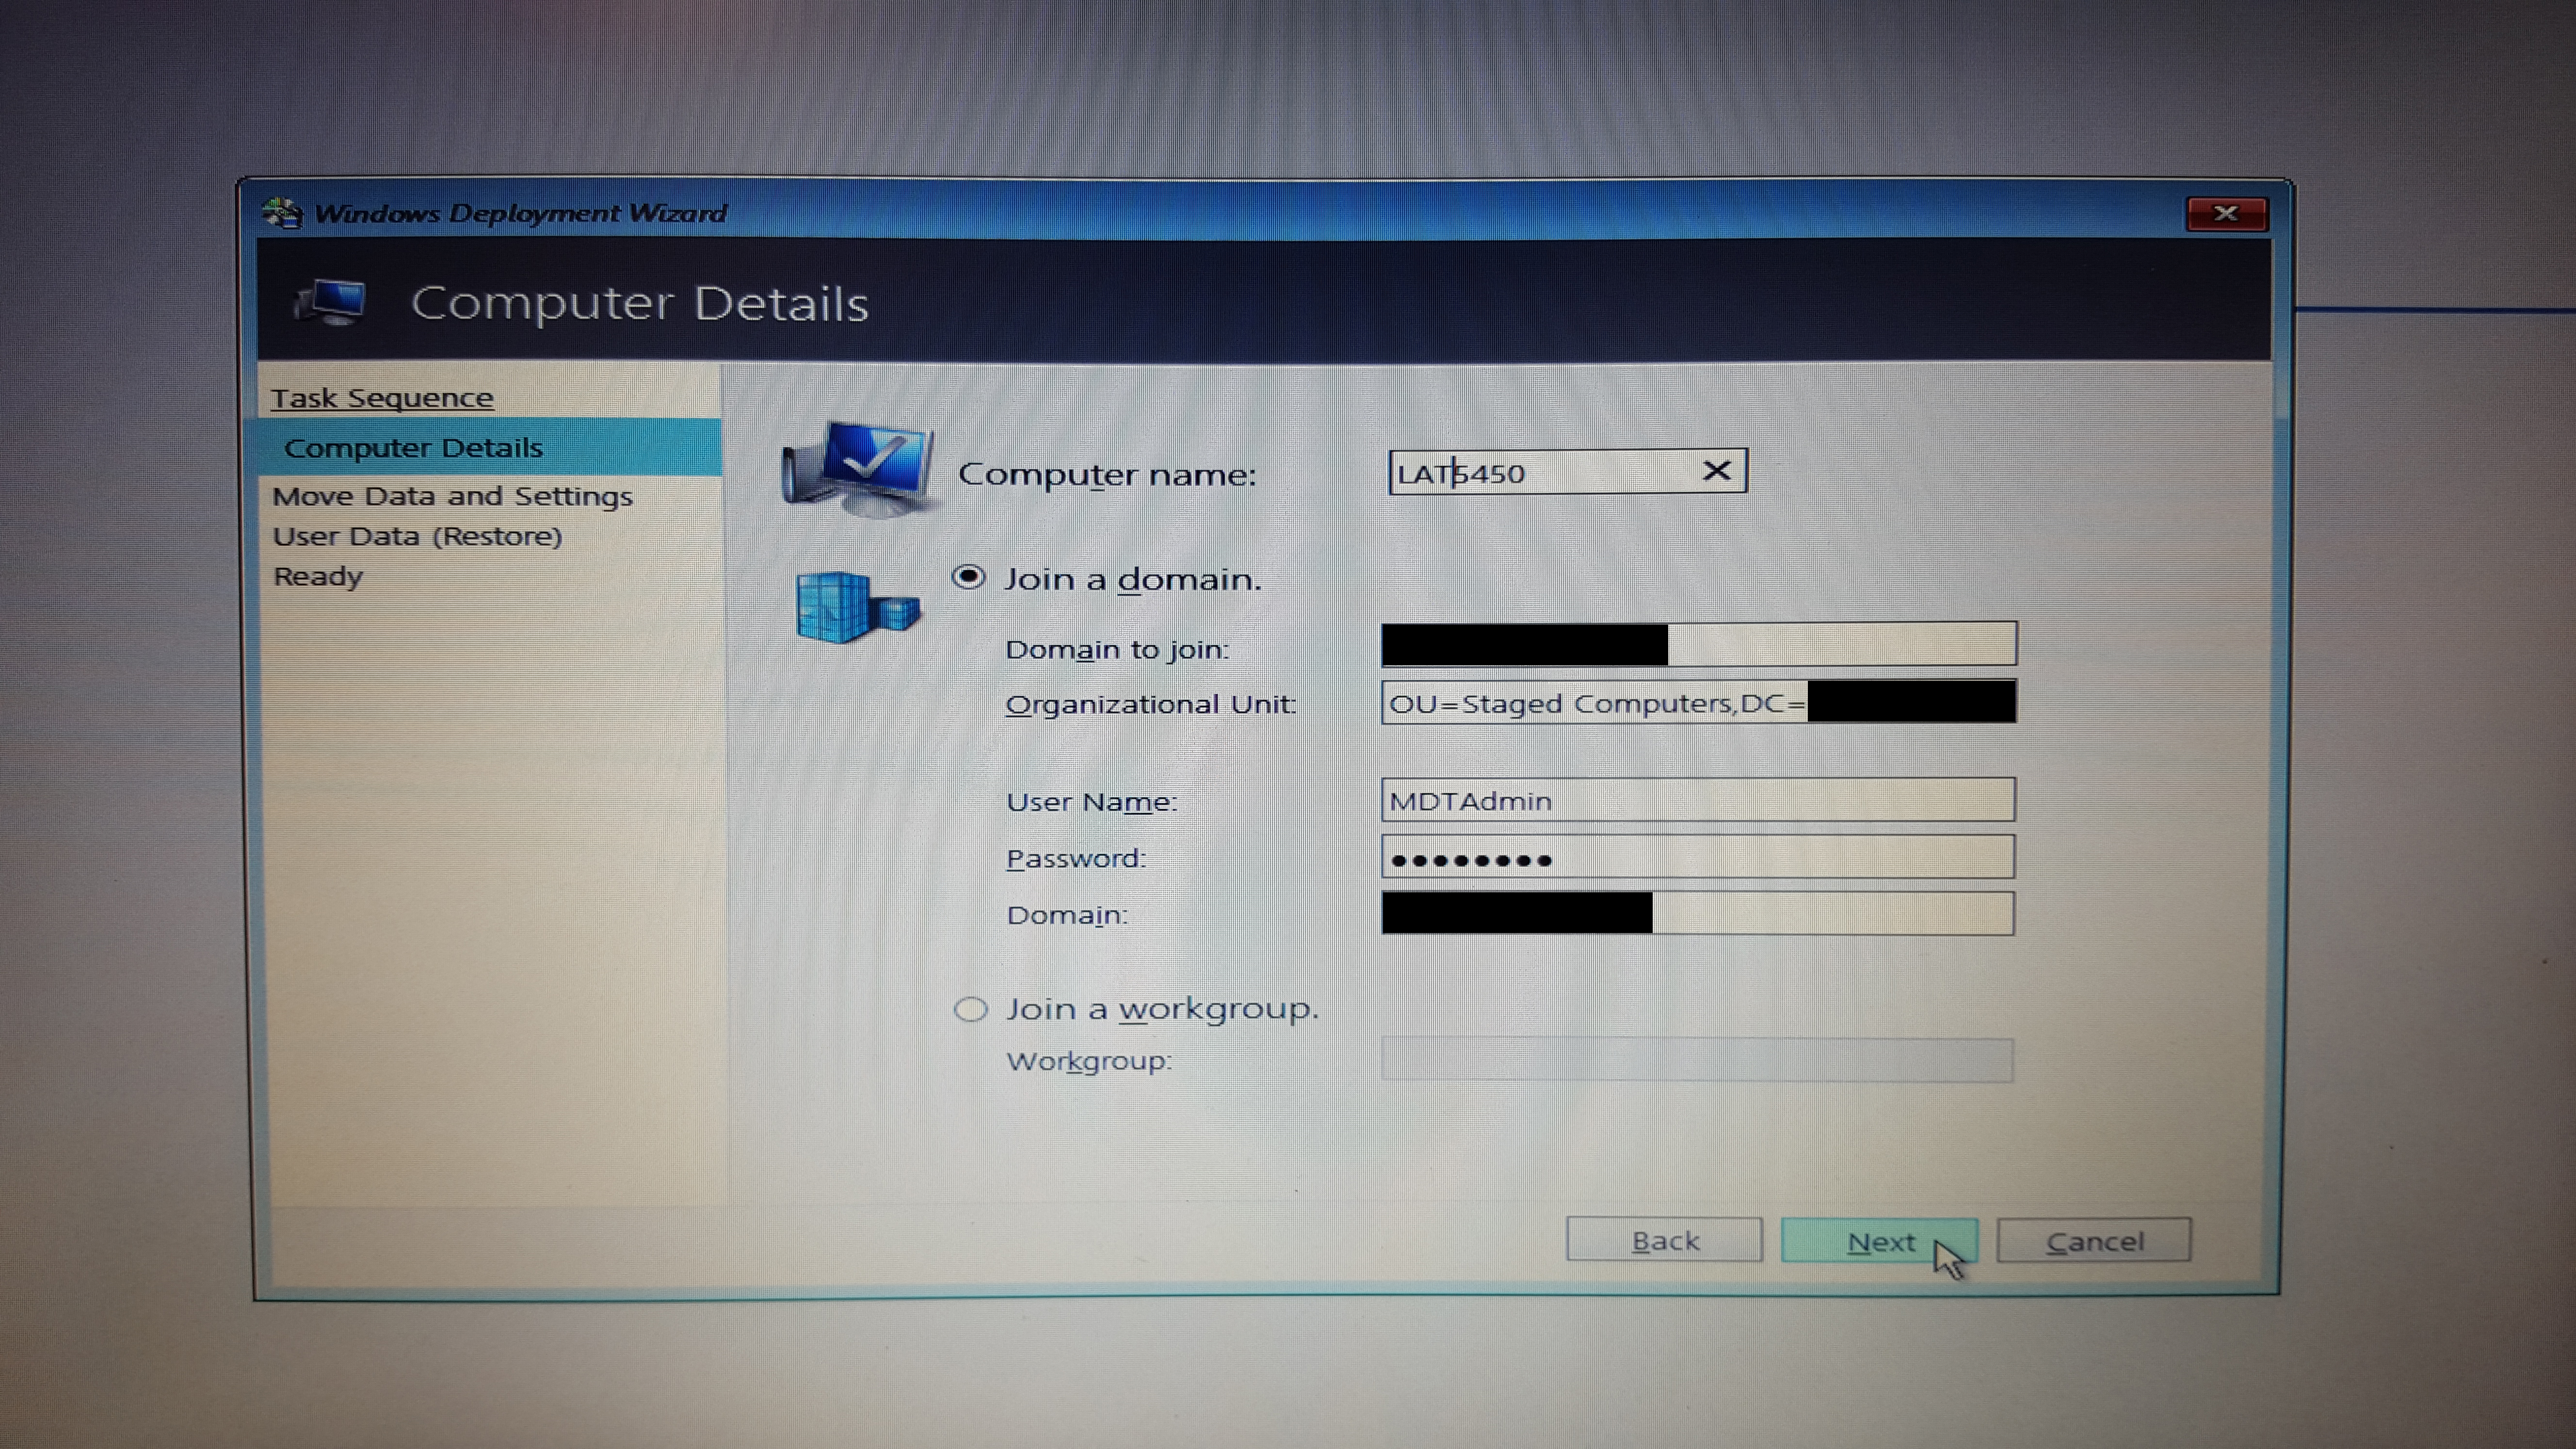
Select your new deployment task sequence and click Next.
You can change the name here as all other information should already be prepopulated from the Rules section in MDT.
We’re not moving user data and settings nor are we restoring it so you can click next through those pages.


You can now click Begin.

You can see it injecting our drivers here.

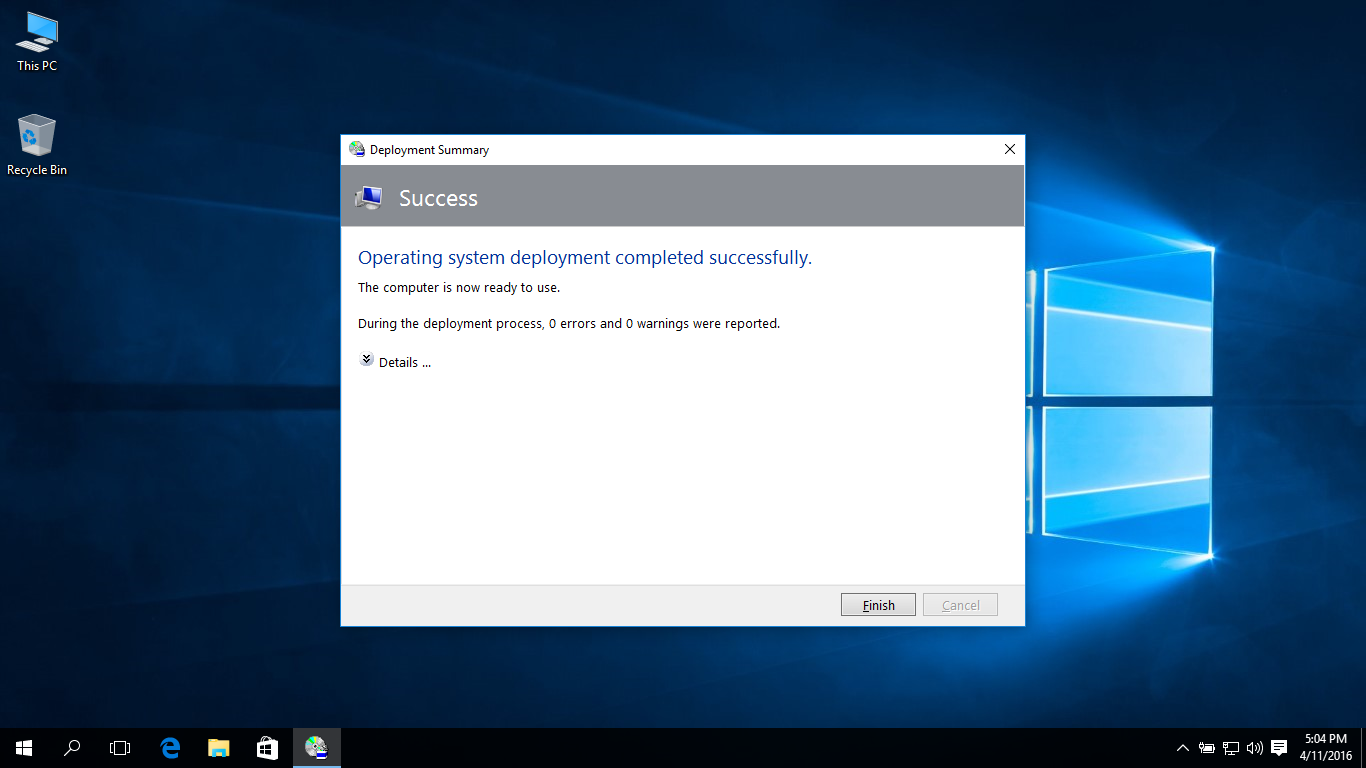
And finally, you should be greeted with a “Completed successfully” screen. And as you can see, by setting CopyProfile=True in the Unattend.xml, it copied over the customizations I made to the desktop icons and task bar.
As you can see, once MDT is configured, it’s very easy to deploy an image to just about any machine model using a single reference image. There is tons more that can be accomplished with MDT which I may include in a future guide but for now, I hope this helps you get started. If you have any comments, questions, or suggestions, feel free to drop those in the comments below.